Halloween 2025 is just over a month away, so I'd better finish last year's post.
For Halloween 2024, I made a porcupine costume:

The Inspiration
I got the idea from a video (a TikTok laundered through Facebook Reels) for a relatively simple kids' porcupine costume, using just black straws and white tape hot-glued to fake fur and velcroed to a hoodie.
The concept looked pretty good, and I figured I could upscale and over-engineer a grown-up version.
The Plan
After a few quick searches, I saw that others had done similar versions using zip ties, so I decided to go that route, using two sizes: your run-of-the-mill 11-inch ones, and then some 24-inch ones.
Because zip ties are heavier than straws, I decided they needed to be set into a mounting plate. I'd been thinking cardboard (foam core wouldn't have any bend), but then I realized I had a leftover sheet of 10mm thick EVA foam (conveniently black, though it would be covered by faux fur I picked up from Michaels), as well as some some heavy-duty (not industrial strength) velcro tape.
Oh, and I didn't have a black zip hoodie, so I bought one. (Zip-front is easier to put on/take off than a pullover.)
After sketching out the general layout, I had a small plate for my head, a thin strip for my neck and upper back, and a wider plate for the middle of my back:

The sketch shows the order of the layers (I glued the hook side velcro directly to the EVA foam), as well as the rough placement of the 11" and 24" zip tie quills, which I canted at different angles and deliberately didn't line up perfectly.
The Build
I stretched out the build over four days, including waiting for supplies from Amazon. I took a chance and didn't do final assembly until the Saturday before Halloween (Halloween was actually the following Thursday), because I was confident that I'd anticipated most of the pitfalls, and oddly, I was mostly right.
- Collect your zip ties and make stripes by cutting and wrapping white duct tape around them. I used the 11-inch zip ties for my head and the outer edges down the back, and 24-inch ties down the spine. I ended up using 35 24-inch and 70 11-inch ties in the costume.

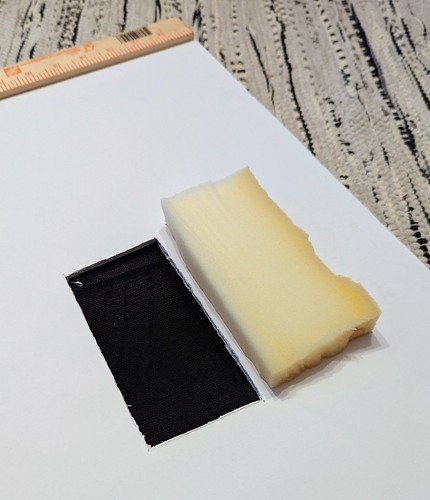
Bundles of zip tie quills, with foam backers and faux fur on a hoodie. - Cut the EVA foam backers to size.
- Cut the fake fur to size (just slightly bigger than the foam base). (Tip: From the back side, use a sharp hobby knife to start a cut in the backing, Then grab both sides and tear. This minimizes the fake fur you need to cut; if you cut all the way through, you'll get bits of fake fur everywhere.)

- Cut holes in the foam (small enough to fit the head of the zip ties, snugly). I used a hollow punch set, which I strongly recommend over using scissors or a knife.

Hole-punched foam backer for the head piece.
With my punches, the 20 Harbor Freight 24" zip ties only required one large hole, but the ones I got from Amazon had bigger heads, so they needed two holes. (The foam stretches, so you don't need to be perfect. You actually want the holes to be a little smaller so they snug down around the head.)
Hole-punched foam backers for the upper- and middle-back pieces. Note the heads of the zip ties are rectangular, so angle the holes as needed to create the pattern you want. (I angled them out to get a wider spread.) Here you can see holes for the small (S) zip ties, and the single- and double-punched holes for the two different kinds of large (L) ones.
- Dry fit the zip ties in the base to make sure they fit, then take them out.

Dry fitting the head piece, seen from underneath. 
Top view of the head piece after dry fitting. 
Dry fitting the upper back piece. - Use the foam base as a template and mark the holes in the back of the fur with a paint marker.

Marked fur and hole-punched foam backer for the head piece. - Use your hobby knife to carefully cut slits in the back of the fur. Test each slit to make sure the zip tie will fit through it. (You don't need to be super exact, it's pretty forgiving.)
- Put the fur side down (with the marked back side facing up), then use spray adhesive or other glue to glue the base to the back of the fur. Make sure the holes line up with the marks.
- Insert the tips of the zip ties through the holes in the foam base and the slits in the fur.

Starting to assemble the head piece. - Push the zip tie heads into the holes in the foam, and when done, glue them in place. (I used hot glue.)


Finished gluing the head piece. As you can see, I used 22 small zip ties for the head. 
Finished putting the quills on the head piece. Just need velcro now. - After the glue dries, cut strips of velcro tape (the scratchy hook side) to size and stick them to the back of the foam.
- Cut matching strips of velcro tape (the fuzzy loop side) to the hoodie. Use extra loop tape to give yourself some mounting options.

- Stick the quill plates where you want them on the hoodie. Be careful if you reposition them, since the velcro tape might pull away. (You can always glue or sew them down.)

Fully assembled and laying on the rug.
After a test fit, I glued some extra strips of fake fur to the head piece to hide the edges, but that seems optional.

I also made some extra quills, just to have and hand out.
That's about it. It's pretty easy to wear, and you can tie the hoodie strings under your chin to keep the hood up.
 |
| View from directly behind. |
 |
| Three-quarter (I think?) rear view. |
Taping the quills took the longest time, but I watched most of Amazon's Patriot season 1 while doing it.
Materials:
- 10mm EVA foam sheet
- Fake fur
- Black zip ties (11" and 24")
- White tape (I used duct tape)
- Black zipper hoodie
- Velcro tape
Tools:
- Hollow punch set and hammer
- Hot glue gun
- Spray glue
- Hobby knife
- Scissors
- Light-colored paint marker


