Showing posts with label costume. Show all posts

Tuesday, September 23, 2025

Halloween 2024 Costume Build: Porcupine

Halloween 2025 is just over a month away, so I'd better finish last year's post.

For Halloween 2024, I made a porcupine costume:

PXL_20241027_055427996~2

The Inspiration

I got the idea from a video (a TikTok laundered through Facebook Reels) for a relatively simple kids' porcupine costume, using just black straws and white tape hot-glued to fake fur and velcroed to a hoodie.

The concept looked pretty good, and I figured I could upscale and over-engineer a grown-up version.

The Plan 

After a few quick searches, I saw that others had done similar versions using zip ties, so I decided to go that route, using two sizes: your run-of-the-mill 11-inch ones, and then some 24-inch ones. 

Because zip ties are heavier than straws, I decided they needed to be set into a mounting plate. I'd been thinking cardboard (foam core wouldn't have any bend), but then I realized I had a leftover sheet of 10mm thick EVA foam (conveniently black, though it would be covered by faux fur I picked up from Michaels), as well as some some heavy-duty (not industrial strength) velcro tape.

Oh, and I didn't have a black zip hoodie, so I bought one. (Zip-front is easier to put on/take off than a pullover.)

After sketching out the general layout, I had a small plate for my head, a thin strip for my neck and upper back, and a wider plate for the middle of my back:

design-sketch

The sketch shows the order of the layers (I glued the hook side velcro directly to the EVA foam), as well as the rough placement of the 11" and 24" zip tie quills, which I canted at different angles and deliberately didn't line up perfectly.

The Build

I stretched out the build over four days, including waiting for supplies from Amazon. I took a chance and didn't do final assembly until the Saturday before Halloween (Halloween was actually the following Thursday), because I was confident that I'd anticipated most of the pitfalls, and oddly, I was mostly right.

  1. Collect your zip ties and make stripes by cutting and wrapping white duct tape around them. I used the 11-inch zip ties for my head and the outer edges down the back, and 24-inch ties down the spine. I ended up using 35 24-inch and 70 11-inch ties in the costume.
    supplies-PXL_20241023_035547413
    Bundles of zip tie quills, with foam backers and faux fur on a hoodie.
  2. Cut the EVA foam backers to size.
     
  3. Cut the fake fur to size (just slightly bigger than the foam base). (Tip: From the back side, use a sharp hobby knife to start a cut in the backing, Then grab both sides and tear. This minimizes the fake fur you need to cut; if you cut all the way through, you'll get bits of fake fur everywhere.)

    hoodie base fur cut PXL_20241024_221118991

  4. Cut holes in the foam (small enough to fit the head of the zip ties, snugly). I used a hollow punch set, which I strongly recommend over using scissors or a knife.
    head base punched PXL_20241024_222036653
    Hole-punched foam backer for the head piece.

    With my punches, the 20 Harbor Freight 24" zip ties only required one large hole, but the ones I got from Amazon had bigger heads, so they needed two holes. (The foam stretches, so you don't need to be perfect. You actually want the holes to be a little smaller so they snug down around the head.)
    mounting plates PXL_20241025_001706607
    Hole-punched foam backers for the upper- and middle-back pieces.

    Note the heads of the zip ties are rectangular, so angle the holes as needed to create the pattern you want. (I angled them out to get a wider spread.) Here you can see holes for the small (S) zip ties, and the single- and double-punched holes for the two different kinds of large (L) ones.

  5. Dry fit the zip ties in the base to make sure they fit, then take them out.
    head base dry fit back PXL_20241024_222529927
    Dry fitting the head piece, seen from underneath.
    head base dry fit front PXL_20241024_222645000
    Top view of the head piece after dry fitting.

    spine base dry fit PXL_20241024_232248381
    Dry fitting the upper back piece.
  6. Use the foam base as a template and mark the holes in the back of the fur with a paint marker.
    head base fur marked PXL_20241024_230221256
    Marked fur and hole-punched foam backer for the head piece.
  7. Use your hobby knife to carefully cut slits in the back of the fur. Test each slit to make sure the zip tie will fit through it. (You don't need to be super exact, it's pretty forgiving.)
     
  8. Put the fur side down (with the marked back side facing up), then use spray adhesive or other glue to glue the base to the back of the fur. Make sure the holes line up with the marks.
     
  9. Insert the tips of the zip ties through the holes in the foam base and the slits in the fur.
    head base quill test PXL_20241024_230555997
    Starting to assemble the head piece.
  10. Push the zip tie heads into the holes in the foam, and when done, glue them in place. (I used hot glue.)

    gluing zip ties PXL_20241026_160018209

    head base glued PXL_20241026_162617850
    Finished gluing the head piece. As you can see, I used 22 small zip ties for the head.
    head base finished PXL_20241026_162714115
    Finished putting the quills on the head piece. Just need velcro now.

  11. After the glue dries, cut strips of velcro tape (the scratchy hook side) to size and stick them to the back of the foam.
     
  12. Cut matching strips of velcro tape (the fuzzy loop side) to the hoodie. Use extra loop tape to give yourself some mounting options.

    velcro taped hoodie PXL_20241026_195822199

  13. Stick the quill plates where you want them on the hoodie. Be careful if you reposition them, since the velcro tape might pull away. (You can always glue or sew them down.)
    PXL_20241027_193704817
    Fully assembled and laying on the rug.

After a test fit, I glued some extra strips of fake fur to the head piece to hide the edges, but that seems optional.

head base with edges PXL_20241026_204552168

I also made some extra quills, just to have and hand out.

That's about it. It's pretty easy to wear, and you can tie the hoodie strings under your chin to keep the hood up. 

PXL_20241027_055308256
View from directly behind.

PXL_20241027_055407058
Three-quarter (I think?) rear view.

Taping the quills took the longest time, but I watched most of Amazon's Patriot season 1 while doing it.

Materials:

  • 10mm EVA foam sheet
  • Fake fur
  • Black zip ties (11" and 24")
  • White tape (I used duct tape)
  • Black zipper hoodie
  • Velcro tape

Tools:

  • Hollow punch set and hammer
  • Hot glue gun
  • Spray glue
  • Hobby knife
  • Scissors
  • Light-colored paint marker

Tuesday, August 29, 2023

Halloween Costume Build 2022: Banana Cop & Human Target

Since I broke the seal with my blog entry yesterday, I figured I might as well pare down the blog backlog (backblog?) and keep the streak going.

There are 63 days until Halloween; here are my costumes from 2022.

Costume #1: Banana Cop

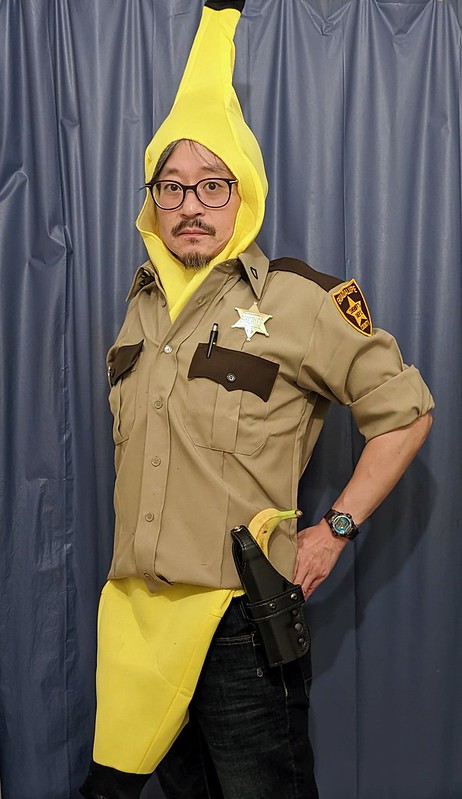
First, I had a to put together a hasty interim costume for Friday night, because I'm no longer pulling all-nighters to finish costumes. I came up with Banana Cop.

 PXL_20221029_043031477~2 

There's not a lot to it; a banana costume under a sheriff's uniform top. Though I thought the holster with a real banana in it was a nice touch. (I had to buy the banana, and I even brought the holster into Safeway to make sure I got one that fit.)

Costume #2: Human Target

The second one for Saturday was an actual build. First up was two pieces of foam core board (with a precisely cut eye slit), hot glued together and reinforced by two Home Depot yardsticks:

 PXL_20221029_200517603~2

Next, some straps. I didn't have any nylon webbing handy, so I made some straps by folding over some duct tape. The buckles and keepers I already had:

 PXL_20221029_210734824~3

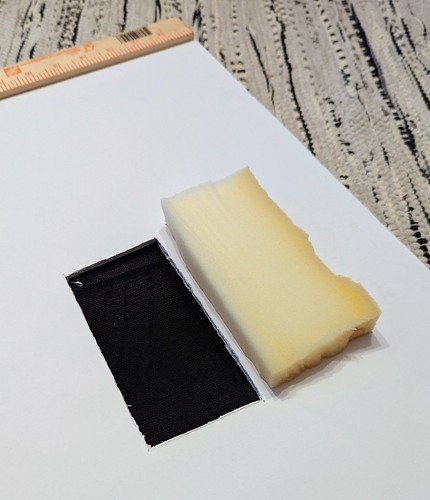
Covering the eye hole is just some black panty hose. I had some left over from early on in the pandemic, when there was a mask hack for improving the effectiveness of surgical masks (just cut a tube of panty hose and put it over the mask to help seal gaps). The forehead pad is so I could wear my glasses; it's just some thick polyurethane foam glued to the board:

 PXL_20221029_210844760~3

Assembly is just more duct tape and hot glue. The setup is super light, so strength isn't an issue, though I had to experiment to find the right height for the straps (around the neck and waist):

PXL_20221029_224839376~2

The front could be any poster sized paper, though the point of this costume was to use a silhouette shooting target (with a hole cut to match the eye slit). 

The holes aren't actually bullet holes; I started with a clean target, put a piece of scrapwood with holes drilled through it behind it, and poked a Sharpie marker through to get holes the right size. The white foam core backing shows right through. Then, I just used some spray adhesive to glue it down:

PXL_20221029_213120527~2

Wearing the costume:

PXL_20221031_235644340~2

From the side; this is clearly meant to be seen from the front only:

PXL_20221101_000749711~2 

You can also use it after Halloween if you want to rent yourself out as half a sandwich board advertisement.

Monday, November 02, 2020

Halloween 2020 Costume: Herndon Station Metro Pylon

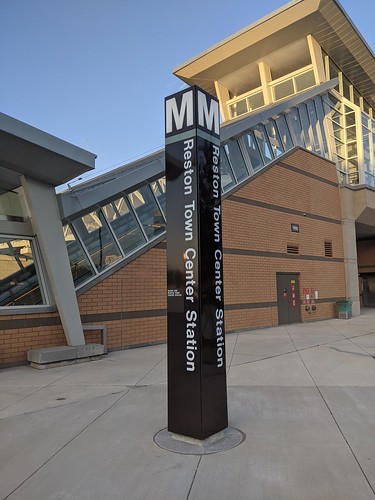
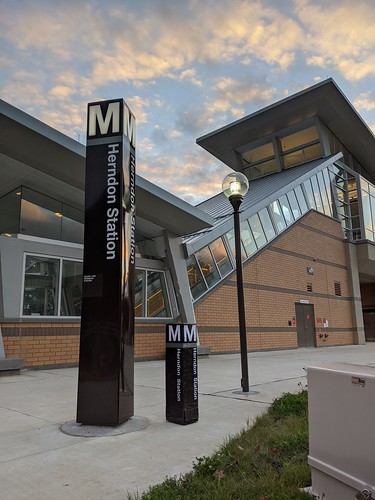
I've been wanting to make a DC Metro station name pylon costume for a while, and figured that this was my last Halloween to do one as a preview of the Phase 2 Silver Line stations before they open (supposedly Summer 2021). And theoretically, it's just a painted box with letters on it, so how hard could it be?

Inspiration

PXL_20201007_220233837 

I was originally going to do the Reston Town Center Station, but decided to go with the shorter-named Herndon Station so the letters would fit better. I didn't want to do a fully enclosed, wearable costume (though you'd just need a big appliance box), and I decided to wear it as a headpiece, since I could reuse the helmet box mount I'd used in previous years.

That was a mistake. 

It probably wouldn't have been as big of a mistake as it turned out, except I decided to make it about 4 feet tall. Great for final proportions, terrible for weight distribution and balance.

The Build

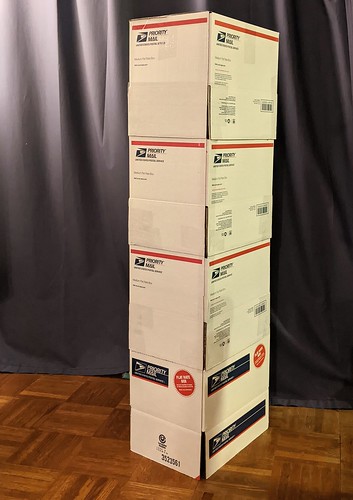
For the main structure, I went with USPS Priority Mail Flat-Rate Medium boxes. (Foam core board probably would have been smoother and lighter, but the boxes were free and I already had a bunch of them.) Instead of just stacking the boxes and gluing them together, I glued the bottom flaps of each upper box to the top flaps of the lower box, effectively doubling the height of each one. (Mistake.)

PXL_20201026_023314773~2 

I also hot-glued braces on the inside corners.

 PXL_20201026_022956377 

This, in turn, led to a hot-glue injury, a small second-degree burn on my finger that I made worse by peeling off the glue, and with it, the top layer of still-forming blister. (I ended up using a series of waterproof bandages to encourage scabless healing.)

 PXL_20201028_190207602.PORTRAIT-01.COVER 

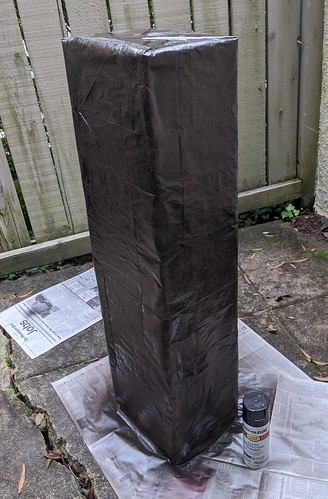
I then took apart a Home Depot yard waste brown bag and wrapped the box with it, then sprayed it with a few coats of Rustoleum Satin Dark Walnut paint:

 PXL_20201027_170233414~2

Decoration

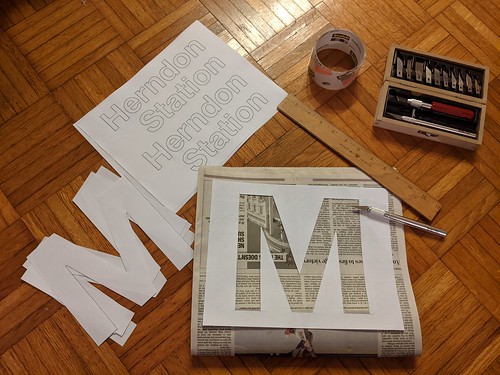
Next, for the lettering, I checked with WMATA's brand and style guide [PDF]; they mostly use Helvetica Neue; I printed the letters out: the big Ms on regular white printer paper, and the Herndon Station letters on sticker paper. 

Cutting out the big Ms was easy; however, I made it through the first two smaller letters (from of the first of four sets I'd need) when I realized that there was no way in hell I'd be delicately Exacto-knifing out all that.

PXL_20201026_033526628 

I quickly realized that going to Office Depot and getting the white letters printed on a matching dark brown background would work almost as well. (There was a side attempt to print the white letters on transparencies, which I think is possible, but my first attempt went nowhere and I didn't pursue it.)

 PXL_20201028_190058108

I cut out each word as a single unit and used spray adhesive to glue them down (as well as the big Ms, which I'd reprinted on cardstock). The Silver Line band was simply duct tape (of course). The first attempt looked like this: 

PXL_20201029_175202594~2 

The next day, I realized that it didn't look right: the "Herndon Station" labels were too small overall; plus, most of the Stations were crooked, and the station names weren't aligned with the edge of the big M on the wide sides (on the actual pylons, all four sides are equal width; my helmet box mount's sides were longer than the front and back). 

I did a re-do, going back to Office Depot to reprint the Herndon Station letters on ledger-size (11x17) cardstock, making sure to align the words and tape them together before gluing them down. (Even with multiple attempts, color, and cardstock, the total printing cost was just over $5.) 

The Result

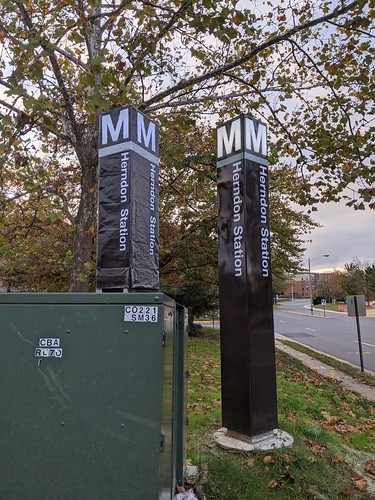
The final result, which you can see next to the real-life Herndon Station pylon (right off Herndon Parkway) looks pretty okay (seen here with a little forced perspective):

PXL_20201031_214028169 

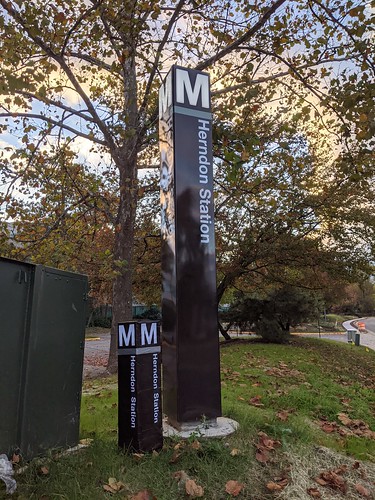
A better size comparison:

 PXL_20201031_214505592 

The other pylon is over by the station entrance. Also, don't talk to me or my son ever again:

 PXL_20201031_215323901 

Now, as I was trying to take a selfie while wearing my costume next to the real pylon, I realized what a mistake I'd made: Just like with my JLENS blimp costume from 2015, I'd underestimated how heavy and unwieldy wearing something like this—even something that's just cardboard, paper, and paint—would be. 

The expression on my face is a grimace as I'm trying to get the angle right while the costume torques my head and drags at my scalp while the chin strap digs into my neck:

PXL_20201031_215717199

Because of the overall height, you can't really wear it indoors. In non-COVID times, it'd be more of a problem, though right now, consider it an incentive to stay outside.

Lessons

The main issue is that it's just too uncomfortable to wear as a headpiece; I probably wore it for less than 10 minutes over the entire night. It'd work much better with a backpack mount (possibly a heat-gun-bent-pvc frame, bungied to a pack frame, or even just stuffed into a knapsack). I need to remember that if I'm ever tempted to do a head-mounted costume again (or at least, one that doesn't need to look like a halo neck brace). 

Other than that:

  • While the satin spray paint was a pretty good color match (with a nice glossy sheen), the lines from the paper bag were pretty prominent (even after I tried to iron them flat), so use paper from a roll or big sheet without any creases.
  • I considered spraying it with clear coat to improve durability, but decided it wasn't necessary for a single outing.
  • Printing your lettering at a print shop is pretty cheap and you can do the layout and design at home, pay online, and pick it up at the store.
  • If you want to get fancy, the big Ms on the real pylons are lighted.

Materials:

Cardboard (boxes or sheets)

Craft paper (preferably rolls)

Glue (hot glue for the structure, spray for the lettering)

Spray paint (Rustoleum Satin Dark Walnut or equivalent)

Duct tape (color-matched to the Metro lines you need)

Lettering printed on cardstock or heavier paper at your print shop of choice (especially if you don't have the skill or patience to paint or cut out all those letters)

Mounting system: I velcroed the headpiece to a head mount (just a box secured to a bicycle helmet), though use a backpack unless you can really get the weight down. And test it first!

Monday, October 31, 2016

Halloween 2016 Costume Lessons: Nobody Watches Quantico

I gave up on ABC's Quantico before the end of Season 1 because it got too ridiculous, but it doesn't mean that I couldn't still make a Halloween costume from it.

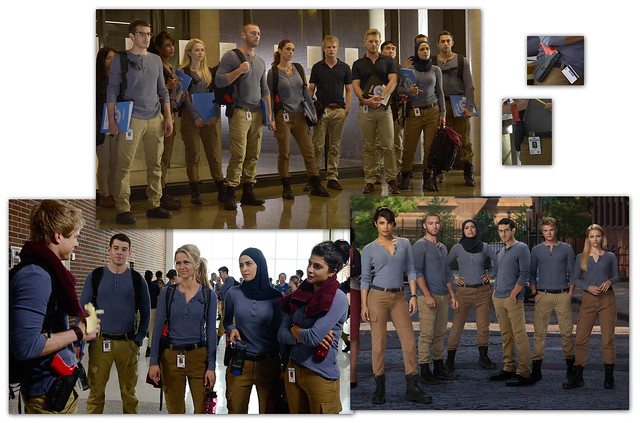
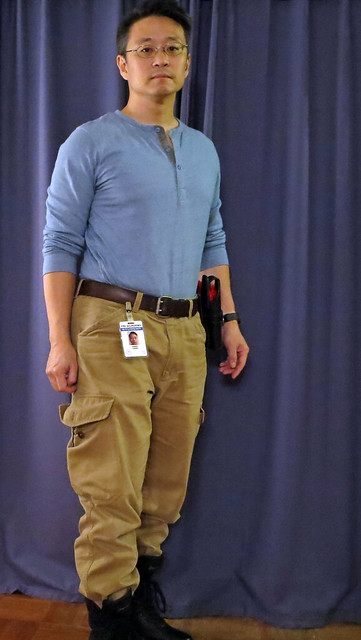
As many have noted, the trainee outfit is built around a light-blue, long-sleeved henley t-shirt, with khaki cargo pants (optionally bloused/tucked), combat boots, red training gun in holster, and a badge.

There were plenty of reference photos:

reference-montage
Up until now, I didn't realize the male and female cargo pants were different shades.
The onscreen blue henley is four-button, waffle-textured, and way too expensive for a long-sleeved t-shirt, but I was able to find an acceptable substitute for $15 on Amazon. The shade was "eh, close enough."

(Incidentally, if you Google search on "light blue waffle henley shirt," there's an important two-word phrase in there that may pull up some verrrrrrry different search results than you might be expecting.)

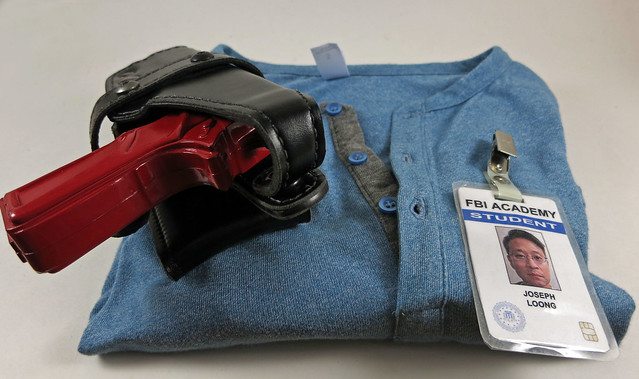
I had everything else (after spray painting red the toy gun from my 2010 sheriff costume), and made the badge in photoshop:

IMG_6583
The fonts are a bit off, but honestly, who cares?
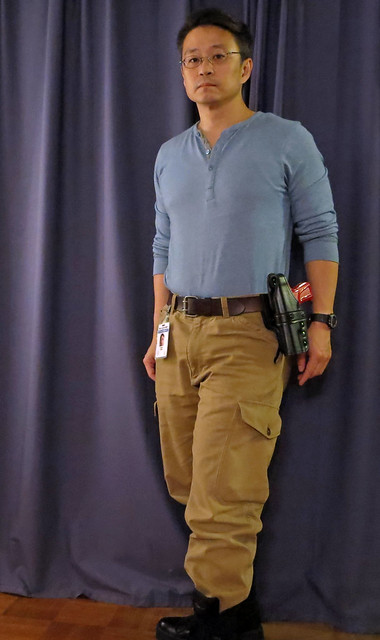
IMG_6573 IMG_6575

As to the finished product, over three wearings in three days, exactly two people knew what the costume was... and one of them was an actual FBI agent. Also, the holster is a pain to drive in.

So, I've used up my fallback costume, which means that I have a year to come up with something for 2017.


Monday, November 09, 2015

My Runaway JLENS Blimp Costume, Halloween 2015

Although I'd made significant progress on my dad bod, I didn't really have a costume for Halloween this year. Getting down to the wire, I was resigned to buying something off-the-rack.


Then, on Wednesday, October 28, a JLENS sensor blimp got loose.


Inspiration struck. But could I do a costume in less than three days?

The Planning
I didn't have a lot of time to plan. Initially, I thought about using a balloon (and in retrospect, I should have tried harder to go this route), but I couldn't find the right shape, so I decided to make something with paper mache.

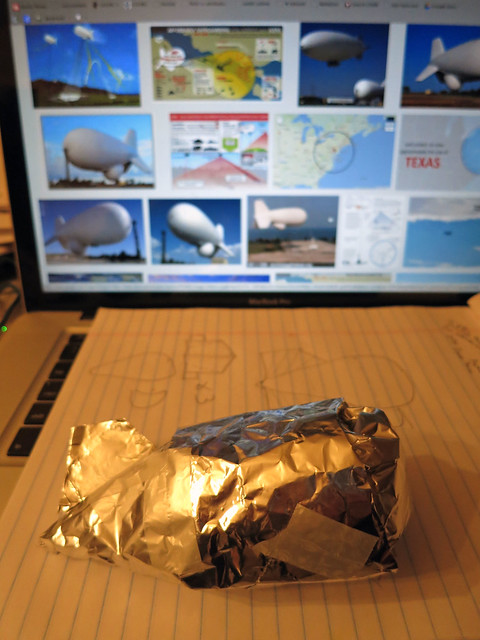
I looked at some reference images, and just needed a rough teardrop shape, with fins, and a bulge on the bottom for the sensor pod. I tried making a model out of aluminum foil:

IMG_4345

The structure would be chicken wire, though I decided to add some supports, using round foam core discs hot-glued onto a dowel:


Next, came the chicken wire, which was a pain to work with. I eventually got it into a teardrop/bomb/whale shape -- since it was a runaway blimp, it didn't need to be perfect. And it wasn't:


I decided I would wear it on my head. For the mount, I wrapped chicken wire around the bike-helmet-in-a-box mount from last year's Speed Hump sign costume, and then wired the "sensor pod" to the bottom of the blimp.

The chicken wire, painful as it was, was the easy part. Next came the paper mache, which I haven't worked with since... I'm not sure. It was messy. I laid it down in neat rows, instead of criss-crossing all around, so the bottom parts wouldn't stay on and there were lots of gaps. I started about 8pm Friday night, and kept going for about 10 hours, before taking a 2-hour nap.


Eventually, by early afternoon on Saturday, it looked like this. I used white duct tape to patch some of the bigger gaps, and used a heat gun to dry off the dampest spots. (If you look closely, you can see scorch marks.)

The fins were easy -- I made 3 out of foam core, and hot-glued them in place. Then it was ready for painting.
It's a lopsided oblong shape, so if I ever need a whale or Super Guppy cargo plane, I'm set.


Because I built it on the floor, I didn't really get a look at the underside. This would be a problem, because I didn't see what the gaps looked like, and since I'd be wearing it on my head, people would be looking up at them. But it was too late to really do anything about it, so I painted it:


The paint was dry to the touch in about 30 minutes, so that was about it.

The Wearing
To test it, I hoisted it onto my head and buckled the strap. It was a lot heavier than I expected, and wasn't balanced particularly well. But I was stuck with it.


Ultimately, I only lasted about 10 minutes under it -- it was unstable, I had a hard time walking indoors with it, and it wasn't very much fun wearing it. So I switched to a backup costume for the rest of the evening.

Like I said, since the aesthetic was "crashed runaway blimp," I could live with the imperfections (and there were many). But if I had to do it again, I wouldn't do paper mache -- it was too heavy to support with just my neck -- I'd just find a regular balloon, or even just tether a helium balloon to my head. And while I can't say I enjoyed the build process, I did find the experience educational.

Materials list:
* 5-pound bag of white flour (for making paper mache)
* Newspaper
* Foam core board (for fins and internal support)
* 5/8" dowel (36" long)
* Roll of chicken wire
* One can of lacquer-style white glossy spray paint
* Hot glue gun
* Heat gun
* "Bike helmet in a box" mounting system
* Pliers and tin ships for cutting and bending wire.